WWW.SKULLFORGESCENICS.ETSY.COM

Monday, January 30, 2012

What’s in the Project Queue?

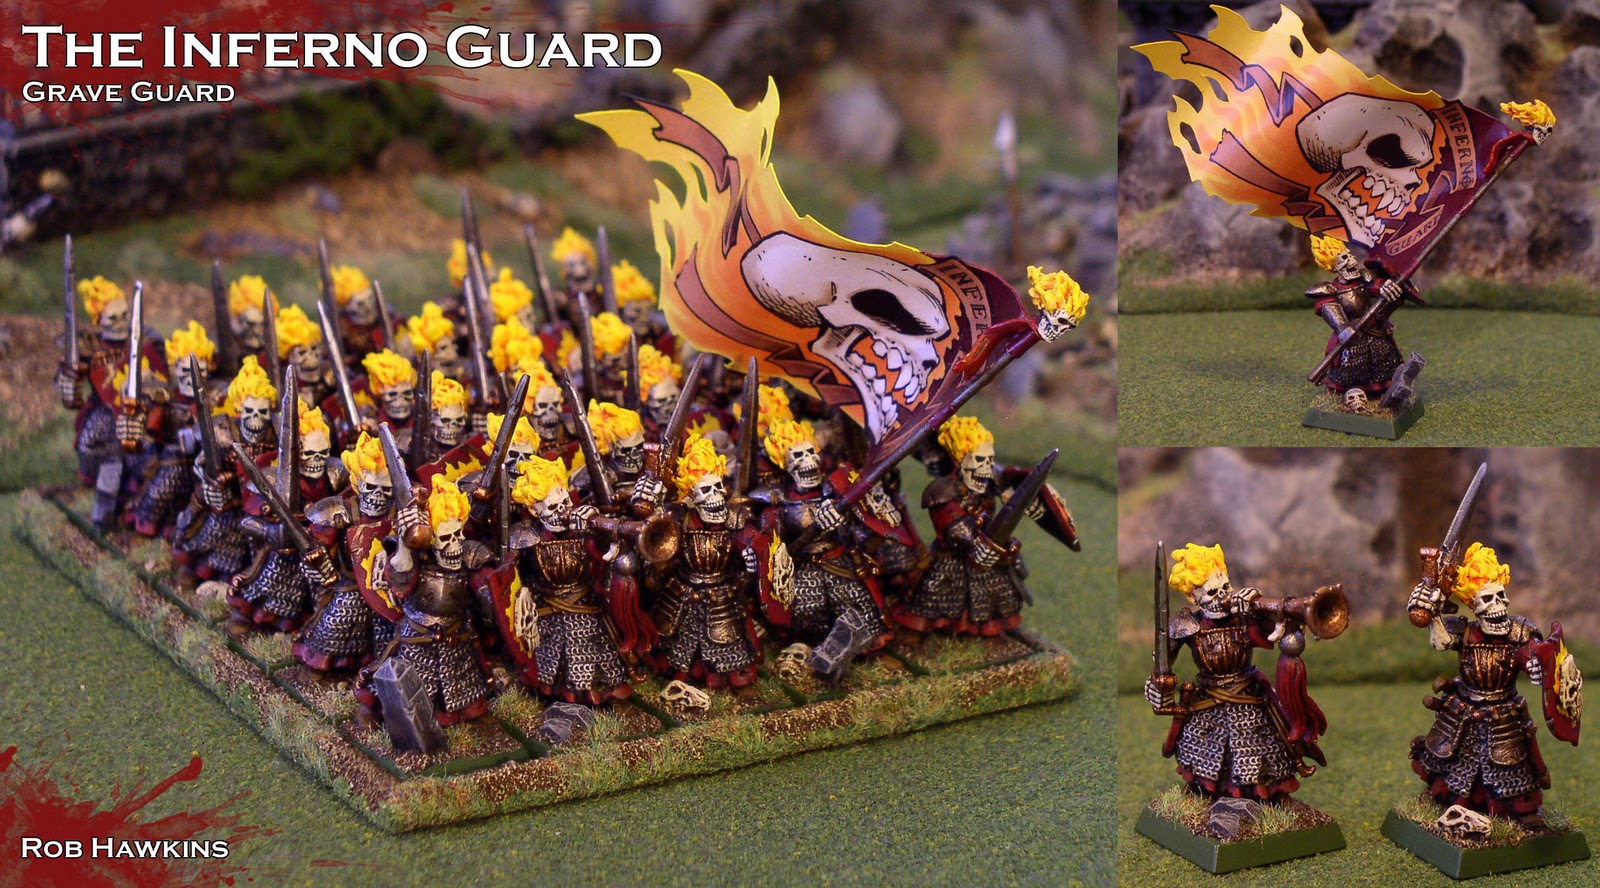
Last week, I finished off my Grave Guard unit. Converting and painting 40 models is a pretty time consuming task, and if it drags on for too long I start to lose sight of the finish line. When I’m drybrushing the robes of the 17th model and I have 23 more to go just to reach what I would consider the mid-point of the project, it becomes really easy to set it aside and work on something else. My general rule of thumb is that the longer a project remains unfinished, the less likely it becomes that the project will actually get finished. 


Just ask this guy:


I started that barricade back in 2001 while involved in a Mordheim campaign. Suffice to say, other projects have taken priority and it has been this way for about 10 years.


For me, the trick is to simply power through the large project and force myself to not work on anything else until it’s finished. I try to alternate blocks of infantry with smaller, but no less challenging, projects like character models, monsters, or vehicles. I view those as a reward for the infantry grind.


I have a few conversion projects that I’ve been planning for a while. So here’s a look at what is to come:


Khador Modeling & Painting

First off, I’ve added a bunch of images to the Khador gallery. Now I’m working on a tutorial covering my painting process and basing scheme.


Wight Kings

I had mentioned the new GW plastic Wight King in a previous post. Now that I’ve picked up a second king, it’s time to equip them both with double-handed axes and create two distinct models from the same static kit. 


The Blood of Martyrs & Thyra

I haven’t worked on my Protectorate army in a while. I have a great idea for a Blood of Martyrs conversion, combining the best parts of the metal and plastic Crusader kits. He’ll need Thyra to go with him, of course.


Varghulf

Varghulf + Balrog wings = AWESOME.  ‘Nuff said.


My goal for February is to get through as many of those projects as I can. Afterward, I’ll move back into another infantry grind. I have some units of converted skeletons and dire wolves that I’ve been meaning to fill out. 


I’ll take you step by step through the conversion and painting and show you how I make my banners.


But before I get to any of that, there’s one project in particular that deserves some attention:


So there you have it – A Mordheim barricade, 10 years in the making!


‘Til next time!

Monday, January 23, 2012

The Legion of the Infernal Skull: A (not so) Brief History

I want to start by welcoming all the new readers. A big thanks goes out to Ross and the guys at Tabletop Gaming News for running the news article about my blog. Even though I’m just getting started, readership has jumped up to 91 in only a week! I really appreciate the positive feedback. Comments and questions are always welcome, so please keep ‘em coming.


The Legion of the Infernal Skull


This was my first gaming army, started back in 1997 when Warhammer was in its 5th edition. The army was merely ‘The Undead’ but would later split into Vampire Counts and Tomb Kings. The photo shows literally every finished model I have, although some of them (like the Black Knights at the back and a few of the older character models) don’t see the tabletop anymore. They don’t really match the army’s aesthetic, and my painting has improved so much since then. If I were to bring the entire legion into battle, I would be fielding between 6500 and 8500 points, depending on whether or not I max out the magic items and character upgrades. (Yeeesh! Two-thousand points worth of magic!)


I plan to eventually write about every element in the army, and discuss how the model conversions were inspired and executed, the characters’ histories, etc. This time out I’ll give you an overview of the army and its theme, and talk about the wights.


It all began with one model:


This skeleton, from the 8-man plastic skeleton box (circa 1995), is the first gaming model I had ever painted. I’ve kept this figure in its original state as a little piece of history, but most of his buddies were either sold off or rebased and rearmed.


My initial basing scheme was a mix of ballast and Goblin Green paint, which was a very common style in the old GW photos. I eventually came to the conclusion that the bright green bases were overpowering the model, drawing your eyes to the base, rather than the miniature. I went back over the army and rebased everything with painted sand and static grass.


The Story


One of the things I enjoy most about building miniatures for this army is coming up with the story behind my characters and units. One of the first regiments I had built was a small block of skeletons. The old plastic box came with water slide transfers, one of which depicted a red-hooded wraith…


In those days wraiths could serve as unit champions, so I painted one with red trim to match the icon, and drew up a banner for the regiment. The unit was named The Crimson Reapers, and Korak the Grim was the wraith leading them into battle. The entire unit was equipped with scythes which at that time represented double-handed weapons.


In life Korak was a necromancer known for preying on villagers for his grizzly experiments. Eventually, the village elders discovered his lair and slew him, entombing Korak's body in a barrow mound protected powerful spells. The necromancer lord, Nieman Kimmel, discovered Korak’s tomb and released him to serve as his undead lieutenant. Korak returned to the village where he was defeated, and murdered everyone. As The Crimson Reapers, they are now eternally enslaved to Korak and do the wraith’s foul bidding.


The Crimson Reapers remains one of my favorite units to this day. I’ve always wanted to model a new version of Korak and I think that will be one of my upcoming projects, along with a new Nieman Kimmel figure. Here’s his old one:


Kimmel is one of my oldest Necromancer models. He’s converted from a Necromunda Arch Zealot, with all of the 40K bits cut off or covered. I really dug the book the model was holding, and would usually equip him with The Cursed Book, a magic item which I’m happy to see has remained in the army book through every iteration.


When the first Vampire Counts book was released at the tail end of the 5th edition, and I made the jump from the Undead army, I was still able to field a Necromancer as the army’s general, and that was usually Kimmel. 


Now here’s where a strange thing happens– Over the course of several games his terrible dice rolling led to miscast spells and (on multiple occasions) having his magic ability drained away. Gamers are a superstitious lot, and I’m no exception. I started playing Kimmel less, relying on my other necromancers and vampires to lead the fight, as if there was a power struggle within the army’s hierarchy. I was toying with the idea to make a new model for Nieman Kimmel and reinstate him as my go-to general, but then the 7th Edition army book came out and necromancers could no longer be fielded as the army’s general. I guess the vampires had come out on top! (How were my miniatures able to predict the future?!)


Well, I certainly didn’t want to spend time on a fancy new Necromancer model that could only ever be a level 1 wizard. Instead, I incorporated it into the army’s story. And as the weakened necromancer bided his time, I focused on some shiny new Blood Dragon vampire conversions:


So, now that the 8th edition army book is out and necromancers can once again be fielded as Lord choices and lead the army, I guess I’ll see what Kimmel has planned for me…


The Flaming Skull


I’ve always been a fan of Ghost Rider. The flaming skull is such a striking image I had to incorporate it into my army banners. The first unit to carry the fiery standard was my old unit of skeleton cavalry, which I dubbed the Hellfire Knights.


These were merely skeleton cavalry in the days of the Undead, but when the army formally became the Vampire Counts, the models were bumped up to the status of Black Knights– Mounted wight cavalry.


When I built my first unit of Grave Guard, I wanted to distinguish the wight infantry from mere skeletons and really solidify the appearance of the army. I made the decision to model all the wights with flaming skulls (Wight Kings, Grave Guard, and Black Knights), and I called the army The Legion of the Infernal Skull.


These Inferno Guard were converted from 5 plastic regiment boxes: Skeletons, Empire State Troops, Empire Knights, Dark Elf Warriors, with some Kroot equipment and armor thrown in. Their hellfire is sculpted with modeling putty.


Over the years I’ve added a lot of models to the army, including new Black Knights. These “Mark 2” Hellfire Knights were converted with old Bretonnian caparison steeds, barding clipped away from an Empire horse, and Manfred Von Carstien’s horse head. The riders are made using old metal Chaos Knight legs, metal Armored Skeleton torsos, and the tall shields from the classic Elven Shield sprue. The fiery lances are from a classic Blood Dragon vampire. You’ve got to love the good old days of the GW bits service!


The army's battle standard is carried by a powerful Wight King. This particular banner serves as a centerpiece to the army, and is much more ornate.


I try to incorporate the flaming skull motif into as many elements as possible–


The Balefire on the Corpse Cart:


The wheels and braziers on the Black Coach: (This is all Ghost Rider, here!)


I’ll close out with my newest addition to the army, a unit of 40 Grave Guard, wielding great weapons. They were designed with the Warhammer 8th edition “Horde” rule in mind, the Execution Guard.


The unit is made from the older metal Grave Guard and skeleton parts, with putty flames of course. The axe heads are from Warmachine’s Boomhowler and Co. and the champion’s axe blade came from Madrak Ironhide. I know there’s a special place in hell for people that use cross-company parts, but I really like the scalloped “bat-wing” edge of these axes. I finished these guys up this weekend and they’re ready for battle!


‘Til next time!

Monday, January 16, 2012

Army Galleries and New Toys


The blog’s header is a sort of “general’s lineup” from my main armies. My plan is to give each army and faction it’s own gallery page. I’ve already dropped a few images into the galleries and I’ll be adding more as time goes by. Check ‘em out! 


I also started a twitter account to use for update announcements. Click the follow me button below. And I promise, there will be no ‘I just ate a sammich at my favorite restaurant’ tweets!


Now on to the fun stuff:


Since the new Vampire Counts models (which look awesome, by the way!) just hit the stores, that’s going to be my main modeling focus for a while. I’ve been eating, sleeping, and breathing Warmachine for the past four years, so it’ll be a nice change of pace to get back to my oldest and dearest army. (I'll still continue to update the other army galleries, though.)


Today I picked up the Vampire Counts army book and a new, plastic Wight King. After a quick read through the bestiary and army list, it appears that aside from a slight adjustment in points and the odd rules tweak, all the existing units are still intact, which is a relief. The main change to the army seems to be the addition of the new units and monsters.


I’m really looking forward to building a few of these Wight Kings. It’s a fantastic model and while it only has one “standard” build, the parts are layered in such a way that converting the miniature will be a snap, allowing all your Wight Kings to each have a unique appearance.


But before I get to him, I'll need to finish off that 40-man Grave Guard unit. I spent most of the weekend working on them and they are nearly finished. Here’s a peek at one of the completed models. I use a flaming skull motif on all of my wights, and it has become the defining trait of my army, but that's something I'll cover in an upcoming post...


'Til next time! 

Saturday, January 7, 2012

A Blast From the Past

Before my time at Privateer Press, I was fortunate enough to work on the GW US hobby team with terrain masters Jason Buyaki and Chad Mierzwa. Some of my favorite projects from those days were the tables that we built for Games Day. 


There are three tables that I am particularly proud of– These were built in 2004 and since I haven’t been to a Games Day in years I don’t even know if the tables are still in service. I’ve tried searching for images online, and either my search-fu is really weak, or there just aren’t any photos out there. Makes me glad I had the foresight to take some pics of the tables before they shipped out, otherwise they may have been lost to the ages. These tables are all constructed on a 4’ x 8’ wooden frame. Each was finished in about a week or two, so I really didn’t have time to take step-by-step shots. If you see something and want to know more about how it was constructed or what parts were used, please shoot me an email or post a comment. 


At the top of my blog is a new tab for my terrain gallery. I have 25 different images for each of these tables, too many to put in a single blog post, but you can poke around in the gallery to see all the different angles and detail shots. 


Now, on to the tables!


"LUSTRIA REVISITED"– A re-envisioning of an older Lizardman temple city table. 


The depressions in the table were burned in with a heat gun, and Envirotex Lite was used for the water. The jungle patches are a mix of scratch-built tree trunks and aquarium plants. The temples and streets are cut from insulation foam, with a few Hirst-Arts bricks added here and there.


"NO-MAN'S-LAND"– Two trench networks separated by (you guessed it) a treacherous no-man’s-land! 


I had designed a few different trench sections and mass-produced them in resin. Putty sandbags and basswood strips were used to conceal the joins between each piece. The standing water in the trenches and craters is Envirotex Lite, given a muddy tint with brown paint.


"DA ORK SKRAP YARD"– a rusting junkyard filled with enough cannibalized tank kits to make a grown man cry!


We had an excess of spare kits to use for terrain projects. The tank kits are cut up and distressed to look like blasted out hulks. The buildings are constructed from foam core and covered with styrene card. The ground covering is a mix of ballast, gravel, and all the sprue rubble you can eat. My favorite bits are all the hidden details and Easter eggs. I’ll let you spot those for yourself.


'Til next time!

Sunday, January 1, 2012

Kicking Off the New Year With a New Hobby Blog

Welcome to my hobby blog! I’m Rob Hawkins, former hobby manager for Privateer Press. You might recognize some of my handywork from the Warmachine books, and the PP hobby site. Starting my own hobby page is something I’ve been meaning to do for a while now, and the start of the new year seems like the perfect time to kick things off.


I’ll be using this blog to feature some of my previous hobby projects, and show off what I’m currently working on. I’ve been collecting miniatures and building wargame terrain for about 15 years, and I’ve got several armies for Warmachine & Hordes, Warhammer 40K & Fantasy, Warmaster, LOTR, Flames of War, and Malifaux. So whatever your game, you should be able to find something of interest here. I hope you’ll follow along!


For starters, here’s a peek into my hobby studio. In our new apartment, I’m fortunate enough to have a second bedroom that serves as my work studio/ and hobby area.


Over to the side is my supply shelf, stocked with all of my paint, flock, tools, and parts bins. Some of my finished models find their home in the display cabinet. My computer and drafting table occupy the other end of the room.


My personal gaming table is an urban, flagstone table built on three 2’ x 4’ sections of insulation foam. The board was designed to be appropriate for Warmachine, Mordheim, or 40K Cityfight, and the panels can be arranged in different combinations to prevent the craters and trenches from always being in the same place from game to game. Check out my tutorial on Terrainthralls.com to see how the boards were built. I’ve also got a GW game mat for a more traditional “flock & forests” type of environment.


I bought two inexpensive tables at Ikea (something like $20 each). Each measures 2’ x 40” so they can easily accommodate a 4’ x 4’ setup with minimal overhang. For a 6’ x 4’ I space the tables apart and have the middle foam panel straddle the gap. If you don’t have space for a dedicated gaming area, this kind of setup is great since the foam panels and even the tables (their legs unscrew) can easily be stored away and set up as needed, or transported in the back of a car over to your buddy’s house for an afternoon of beer & bloodshed.


Usually, I keep one of the game board panels out on display and keep the other table clear to use as a work area. Here you can see my latest project – a batch of 40 Grave Guard armed with great weapons– about halfway through their painting. But we’ll get to them another time…


'Til next time!